Tuesday, December 10, 2013
Back, finally
Was gone from posting for way too long. Will remedy that in the future. For now, here's a post on the Relic Shield from League of Legends.
Support Gold Generation - The Power of Double Gold Generation Items and the Danger of Relic Shield
1. Intro
2. Shorthand Notes
3. GP/10 Values
4. Primary vs. Support Gold
5. Relic Shield on Primaries
6. Relic Shield Changes
Intro
Most players realized the power of Relic Shield pre-nerf. It was quite obvious how strong it was and the lane opportunities that it opened up. What surprises me though, is how quickly those new lane strategies were quickly dropped by the solo crowd when the nerf came around. Mob mentality seems to have immediately dismissed the use of Relic Shield on Primary lane partners.
While the nerf to Relic Shield has brought its Tier 1 form more into line with Ancient Coin and Spellthief's edge, the nerf did nothing to address the true power of Relic Shield. Relic Shield can still be used highly effectively as a means to give TWO gold generating items to the Support lane partner. I will attempt to show why this is so effective, and how it can best be utilized. Then I will talk about how this one item can effectively change the current meta, and how/if it should be changed to prevent this.
There will be a lot of numbers until the end of section 4, where I will start to bring everything together. If you're not interested in the math and numbers, just skip to there.
Shorthand Notes
AC = Ancient Coin
SE = Spellthief's Edge
RS = Relic Shield
T1,T2,T3 = Tier 1, 2, 3 respectively of the specific item.
M(x) = Mastery where x is the mastery name
Primary = Lane partner that takes CS.
Support = Lane partner that does not take CS.
Gold gain of each Gold Generation item as well as their combinations with Relic Shield on the primary. All items are upgraded to T2 at the 10 minute mark.

GP/10 Values
This is a list of all the predictable gp/10 sources that can be found in a lane.
13 = Base GP/10
28.33+1.11(per 3 minutes) = Creep Wave GP/10 Equivalent
5.3 = Runes
1.5 = M(Greed)
2.11 = M(Scavenger)
0 - 12 = M(Bandit)
4.2 = AC-T1
10.4 = AC-T2
2 -10 = SE-T1
4 - 20 = SE-T2
5.55+.138 = RS-T1(On Support-Support's Gain)
.833 = RS-T1(On Support-Primary's Gain)
8.88+.222 = RS-T2(On Support-Support's Gain)
3.33 = RS-T2(On Support-Primary's Gain)
6.38+.138 = RS-T1(On Primary-Support's Gain)
12.22+.222 = RS-T2(On Primary-Support's Gain)
9.72+.222 = RS-T1 (On Primary/Support - Support's Gain)
18.88+.388 = RS-T2 (On Primary/Support - Support's Gain)
Primary vs. Support Gold
A few gp/10 scenarios for Primary vs Support. M(Bandit) and SE will be evaluated at .25-.5 of their stealing potential for a medium to high realism value.
-----Primary-----
13 = Base gp/10
28.33+1.11(per 3m) = Creep Wave
41.33+1.11(per 3m) = Most likely gp/10 for a Primary with perfect CS.
Add (Possible) - Only one real addition, if your Support picks up RS.
.833/3.33 if the Support has RS-T1/T2
44.66+1.11(per 3m) = New total if Support has RS-T2
Add (Unlikely) - For some reason Primary goes deep Utility Masteries
5.3 = Runes
1.5 = M(Greed)
3 - 6 = M(Bandit)
54.46 - 57.46+1.11(per 3m) = New total if Primary runs gp/10 Runes and Masteries.
-----Support-----
13 = Base gp/10
Add (Likely) - First Add the Utility Masteries
1.5 = M(Greed)
2.11 = M(Scavenger)
3 - 6 = M(Bandit)
6.61 - 9.61 = Total likely addition, Support Masteries
19.61 - 22.61 = Likely Base gp/10 for Support going Support Masteries
Total With Gold Item
25.11 - 28.11 = RS-T1, +5.55
28.41 - 31.41 = RS-T2, +8.88
23.81 - 26.81 = AC-T1, +4.2
30.01 - 33.01 = AC-T2, +10.4
23.61 - 28.61 = SE-T1, +4-6
27.61 - 33.61 = SE-T2, +8-12
Total if Primary buy's Relic Shield - Assuming Support has T2 item.
32.72 - 35.72 = T1, RS on Support, + 4.17
38.47 - 41.47 = T2, RS on Support, + 10
36.39 - 39.39 = T1, AC on Support, +6.38
42.23 - 45.23 = T2, AC on Support, +12.22
33.99 - 40.99 = T1, SE on Support, +6.38
39.83 - 46.83 = T2, SE on Support, +12.22
Add (Unlikely) - If Support runs gold runes
5.3 = Runes
Final totals if Primary runs RS-T2
43.77 - 46.77 = RS (add .22 per 3 mins for creep gold increase)
47.53 - 50.53 = AC
45.13 - 52.13 = SE
-----Primary vs. Support-----
For ease of comparison I will leave out the creep gold increase over time and will assume T2 item on Support.
Likely - This the important one
41.33 = Primary
27.61 - 33.61 = Support
32.72 - 40.99 = Support w/ Primary RS-T1 (18.5% to 21.9% increase)
38.47 - 46.83 = Support w/ Primary RS-T2 (39.3% increase)
Unlikely - Maximum potential with realistic values for M(Bandit) and SE
54.46 - 57.46 = Primary, Utility Masteries, gp/10 runes
43.77 - 52.13 = Support, Utility Masteries, gp/10 runes, w/ Primary RS-T2
Unrealistic - Just for fun, if you could max the potential of M(Bandit) and SE
63.46 = Primary
66.13 = Support
-----Conclusions------
The ability for supports to gain gold is extremely high and in some cases it is actually higher than what their lane counterpart has the ability to earn. On top of this, the Support receives less downtime on gold generation than the Primary does, they still generate gold outside of lane as well as generating even more gold when the Primary is outside of lane.
However, this hinges on your Primary picking up RS, and hopefully building it into its T2 version. RS-T1/T2 is such a massive increase to support gold while also being extremely consistent, as RS is highly consistent and suffers from very little downtime. While the numbers put the increase around 39%, I believe the increase is actually higher, just because of how consistent RS is compared to all other forms of lane gp/10 generation.
This allows Supports to plan for the extra gold generation and actually build in a manner to be just as powerful as their Primary counterparts. It also opens up paths of sacrificing other forms of gold generation for more early game oomph. This can include not using gp/10 runes, or the Utility mastery tree and instead running 21 in Offense or Defense. In the next section I will talk about the trade-offs in lane that this can cause.
Relic Shield on Primaries
So we have established that picking up RS on the Primary lane partner is a huge increase in gold generation of the Support partner (the largest single increase possible). The question then becomes, what are you sacrificing by picking up Relic Shield as the Primary. In most cases, the primary will be an ADC, picking up Doran's Blade. Let's look at the differences between the two.
Doran's Blade
+8 AD
+30 HP
Relic Shield
+2 Health Pots
+Proc Heal
The regen on both items is pretty similar when you take into account how often attacks are made versus the constant hp/5, so we can call that similar. Taking that out, Doran's Blade has slightly more hp and gives some damage. With Relic Shield however, you get 2 extra pots. These extra pots provide much more sustain than Doran's Blade, and can make up for the HP if used during a fight. The biggest trade off, is the damage. So lets look at what bringing a Relic Shield on your Primary, allows for your Support to bring, without sacrificing gold generation.
If your support moves from a deep Utility tree mastery build to a deep Offensive tree build, they can bring much much more damage at level one that the +8 from the Doran's Blade brings. With AP blue/Quints, the change gives your support +11 AP at level 1, on top of all the other damage increase masteries like Havoc, Executioner, and Arcane Blade to name a few. Not only does this bring more damage/defense in the lane, but it also brings more of the same to the late game, as your Support will scale even better.
Starting with a Relic Shield, and potentially upgrading it to Targon's Brace is a personal sacrifice yes, but its only a very small one, especially compared to the massive benefit it brings to your partner. It's one that all Primary lane partners should start to consider. In my opinion, its far superior to any other item you could start with.
Relic Shield Changes
Relic Shield has to change. In it's current form it has the power to be Meta defining. Relic Shield is the only item in the game that has the ability to create gold for another player, there is nothing else like it. With how strong Relic Shield is in terms of gold generation for your partner, on top of how strong gold generation items are for Supports, the ability to essentially give a support TWO gold generation items is borderline game breaking. A single item should never define the metagame, but Relic Shield is very close to doing so. If it comes to light that it is the vastly superior choice (which I think it is), there will no longer be a choice. It will end up defining roles, and the champions that can fill them. This is simply way too much power for a single item.
As much as I enjoy Relic Shield, one of two things need to happen. First, they add in more items that give gold to your partner, essentially creating choice in items. However this would not change the power that these items have, only solidify their role in defining the metagame. The other solution, and seemingly more useful one, is to make it so that Relic Shield cannot share gold with someone who already has a gold generation item. This simple design change would halt this item's hiding power without hampering it for supports who want to pick it up.
And as one last small note, I'd like to see the execute return for ranged champions, but at a much lesser amount, say 25-50 + AD. Its a large quality of life improvement, especially in solo Q's for supports who have to deal with lane partners who do not let them last hit.
Ending
I hope this was informative. I know I can be a bit long winded, but I actually love Relic Shield a lot in it's current form, I just believe it will become too game defining, potentially reversing the roles of Primary/Support as well as removing a dedicated jungler. Until then, and if it doesn't, then I hope it inspires you to try out some more unique setups (Ashe + Volibear is currently my favorite).
2. Shorthand Notes
3. GP/10 Values
4. Primary vs. Support Gold
5. Relic Shield on Primaries
6. Relic Shield Changes
Intro
Most players realized the power of Relic Shield pre-nerf. It was quite obvious how strong it was and the lane opportunities that it opened up. What surprises me though, is how quickly those new lane strategies were quickly dropped by the solo crowd when the nerf came around. Mob mentality seems to have immediately dismissed the use of Relic Shield on Primary lane partners.
While the nerf to Relic Shield has brought its Tier 1 form more into line with Ancient Coin and Spellthief's edge, the nerf did nothing to address the true power of Relic Shield. Relic Shield can still be used highly effectively as a means to give TWO gold generating items to the Support lane partner. I will attempt to show why this is so effective, and how it can best be utilized. Then I will talk about how this one item can effectively change the current meta, and how/if it should be changed to prevent this.
There will be a lot of numbers until the end of section 4, where I will start to bring everything together. If you're not interested in the math and numbers, just skip to there.
Shorthand Notes
AC = Ancient Coin
SE = Spellthief's Edge
RS = Relic Shield
T1,T2,T3 = Tier 1, 2, 3 respectively of the specific item.
M(x) = Mastery where x is the mastery name
Primary = Lane partner that takes CS.
Support = Lane partner that does not take CS.
Gold gain of each Gold Generation item as well as their combinations with Relic Shield on the primary. All items are upgraded to T2 at the 10 minute mark.
GP/10 Values
This is a list of all the predictable gp/10 sources that can be found in a lane.
13 = Base GP/10
28.33+1.11(per 3 minutes) = Creep Wave GP/10 Equivalent
5.3 = Runes
1.5 = M(Greed)
2.11 = M(Scavenger)
0 - 12 = M(Bandit)
4.2 = AC-T1
10.4 = AC-T2
2 -10 = SE-T1
4 - 20 = SE-T2
5.55+.138 = RS-T1(On Support-Support's Gain)
.833 = RS-T1(On Support-Primary's Gain)
8.88+.222 = RS-T2(On Support-Support's Gain)
3.33 = RS-T2(On Support-Primary's Gain)
6.38+.138 = RS-T1(On Primary-Support's Gain)
12.22+.222 = RS-T2(On Primary-Support's Gain)
9.72+.222 = RS-T1 (On Primary/Support - Support's Gain)
18.88+.388 = RS-T2 (On Primary/Support - Support's Gain)
Primary vs. Support Gold
A few gp/10 scenarios for Primary vs Support. M(Bandit) and SE will be evaluated at .25-.5 of their stealing potential for a medium to high realism value.
-----Primary-----
13 = Base gp/10
28.33+1.11(per 3m) = Creep Wave
41.33+1.11(per 3m) = Most likely gp/10 for a Primary with perfect CS.
Add (Possible) - Only one real addition, if your Support picks up RS.
.833/3.33 if the Support has RS-T1/T2
44.66+1.11(per 3m) = New total if Support has RS-T2
Add (Unlikely) - For some reason Primary goes deep Utility Masteries
5.3 = Runes
1.5 = M(Greed)
3 - 6 = M(Bandit)
54.46 - 57.46+1.11(per 3m) = New total if Primary runs gp/10 Runes and Masteries.
-----Support-----
13 = Base gp/10
Add (Likely) - First Add the Utility Masteries
1.5 = M(Greed)
2.11 = M(Scavenger)
3 - 6 = M(Bandit)
6.61 - 9.61 = Total likely addition, Support Masteries
19.61 - 22.61 = Likely Base gp/10 for Support going Support Masteries
Total With Gold Item
25.11 - 28.11 = RS-T1, +5.55
28.41 - 31.41 = RS-T2, +8.88
23.81 - 26.81 = AC-T1, +4.2
30.01 - 33.01 = AC-T2, +10.4
23.61 - 28.61 = SE-T1, +4-6
27.61 - 33.61 = SE-T2, +8-12
Total if Primary buy's Relic Shield - Assuming Support has T2 item.
32.72 - 35.72 = T1, RS on Support, + 4.17
38.47 - 41.47 = T2, RS on Support, + 10
36.39 - 39.39 = T1, AC on Support, +6.38
42.23 - 45.23 = T2, AC on Support, +12.22
33.99 - 40.99 = T1, SE on Support, +6.38
39.83 - 46.83 = T2, SE on Support, +12.22
Add (Unlikely) - If Support runs gold runes
5.3 = Runes
Final totals if Primary runs RS-T2
43.77 - 46.77 = RS (add .22 per 3 mins for creep gold increase)
47.53 - 50.53 = AC
45.13 - 52.13 = SE
-----Primary vs. Support-----
For ease of comparison I will leave out the creep gold increase over time and will assume T2 item on Support.
Likely - This the important one
41.33 = Primary
27.61 - 33.61 = Support
32.72 - 40.99 = Support w/ Primary RS-T1 (18.5% to 21.9% increase)
38.47 - 46.83 = Support w/ Primary RS-T2 (39.3% increase)
Unlikely - Maximum potential with realistic values for M(Bandit) and SE
54.46 - 57.46 = Primary, Utility Masteries, gp/10 runes
43.77 - 52.13 = Support, Utility Masteries, gp/10 runes, w/ Primary RS-T2
Unrealistic - Just for fun, if you could max the potential of M(Bandit) and SE
63.46 = Primary
66.13 = Support
-----Conclusions------
The ability for supports to gain gold is extremely high and in some cases it is actually higher than what their lane counterpart has the ability to earn. On top of this, the Support receives less downtime on gold generation than the Primary does, they still generate gold outside of lane as well as generating even more gold when the Primary is outside of lane.
However, this hinges on your Primary picking up RS, and hopefully building it into its T2 version. RS-T1/T2 is such a massive increase to support gold while also being extremely consistent, as RS is highly consistent and suffers from very little downtime. While the numbers put the increase around 39%, I believe the increase is actually higher, just because of how consistent RS is compared to all other forms of lane gp/10 generation.
This allows Supports to plan for the extra gold generation and actually build in a manner to be just as powerful as their Primary counterparts. It also opens up paths of sacrificing other forms of gold generation for more early game oomph. This can include not using gp/10 runes, or the Utility mastery tree and instead running 21 in Offense or Defense. In the next section I will talk about the trade-offs in lane that this can cause.
Relic Shield on Primaries
So we have established that picking up RS on the Primary lane partner is a huge increase in gold generation of the Support partner (the largest single increase possible). The question then becomes, what are you sacrificing by picking up Relic Shield as the Primary. In most cases, the primary will be an ADC, picking up Doran's Blade. Let's look at the differences between the two.
Doran's Blade
+8 AD
+30 HP
Relic Shield
+2 Health Pots
+Proc Heal
The regen on both items is pretty similar when you take into account how often attacks are made versus the constant hp/5, so we can call that similar. Taking that out, Doran's Blade has slightly more hp and gives some damage. With Relic Shield however, you get 2 extra pots. These extra pots provide much more sustain than Doran's Blade, and can make up for the HP if used during a fight. The biggest trade off, is the damage. So lets look at what bringing a Relic Shield on your Primary, allows for your Support to bring, without sacrificing gold generation.
If your support moves from a deep Utility tree mastery build to a deep Offensive tree build, they can bring much much more damage at level one that the +8 from the Doran's Blade brings. With AP blue/Quints, the change gives your support +11 AP at level 1, on top of all the other damage increase masteries like Havoc, Executioner, and Arcane Blade to name a few. Not only does this bring more damage/defense in the lane, but it also brings more of the same to the late game, as your Support will scale even better.
Starting with a Relic Shield, and potentially upgrading it to Targon's Brace is a personal sacrifice yes, but its only a very small one, especially compared to the massive benefit it brings to your partner. It's one that all Primary lane partners should start to consider. In my opinion, its far superior to any other item you could start with.
Relic Shield Changes
Relic Shield has to change. In it's current form it has the power to be Meta defining. Relic Shield is the only item in the game that has the ability to create gold for another player, there is nothing else like it. With how strong Relic Shield is in terms of gold generation for your partner, on top of how strong gold generation items are for Supports, the ability to essentially give a support TWO gold generation items is borderline game breaking. A single item should never define the metagame, but Relic Shield is very close to doing so. If it comes to light that it is the vastly superior choice (which I think it is), there will no longer be a choice. It will end up defining roles, and the champions that can fill them. This is simply way too much power for a single item.
As much as I enjoy Relic Shield, one of two things need to happen. First, they add in more items that give gold to your partner, essentially creating choice in items. However this would not change the power that these items have, only solidify their role in defining the metagame. The other solution, and seemingly more useful one, is to make it so that Relic Shield cannot share gold with someone who already has a gold generation item. This simple design change would halt this item's hiding power without hampering it for supports who want to pick it up.
And as one last small note, I'd like to see the execute return for ranged champions, but at a much lesser amount, say 25-50 + AD. Its a large quality of life improvement, especially in solo Q's for supports who have to deal with lane partners who do not let them last hit.
Ending
I hope this was informative. I know I can be a bit long winded, but I actually love Relic Shield a lot in it's current form, I just believe it will become too game defining, potentially reversing the roles of Primary/Support as well as removing a dedicated jungler. Until then, and if it doesn't, then I hope it inspires you to try out some more unique setups (Ashe + Volibear is currently my favorite).
Sunday, October 6, 2013
Some Infographics from the World Championships - League of Legends
World's is over, and there's a plethora of stats that I've taken from it, and I wanted to share in an easier manner than my spreadsheets, so I made some infographics. They aren't the prettiest, but I hope they get the information across easily! I would love to know what you think, or even just here if you think these are neat or peaked curiosity. Also if you have any questions on what these numbers mean in terms of Game Analysis, please ask, I'd love to answer. I'll be putting up some of my thoughts on them later, but for now, here they are!
Spreadsheets from the Worlds can be found here.
Information may not be 100% correct, but should be extremely close. I did have to take these stats by hand.
1. Team Scores

2. Champion Overview

3. Champion Details

4. Objective Control Overview

5. First Objective Control Details

Spreadsheets from the Worlds can be found here.
Information may not be 100% correct, but should be extremely close. I did have to take these stats by hand.
1. Team Scores
2. Champion Overview
3. Champion Details
4. Objective Control Overview
5. First Objective Control Details
Monday, September 30, 2013
Fnatic vs. Club Royal, Game 4 - A look at Post-Fight Decision Making and Objective Control
The semi-final games between Club Royal and Fnatic were exciting to watch. As a spectator it was enjoyable to see so much fighting going on and so many back and forth battles. If you haven't watched them, you should go and do so, they are worth it.
There is one thing I found particularly disappointing though. Consistently, Fnatic was winning team-fights and getting kill leads, however, they were not doing very much with these. This was a constant problem for Fnatic throughout all four games and I wanted to take a deeper look into why Fnatic lost the series, even while winning most of the team-fights.
Though there were multiple problems - losing lanes, cs numbers, vision control, etc - I feel that Fnatics biggest problem was their decision making after team-fights and their general lack of objective control throughout the series. Aside from Game 1, Fnactic had the kill and teamfight leads, but even so, in all four games Royal was the first to secure the primary map/vision control objectives, the first turret and the outer turrets. I feel that Game 4 exemplifies this problem best, with Fnatic's huge kill lead but lack of doing anything with it, so I will be using Game 4 as an example.
Game 1 Game 2 Game 3 Game 4
First Kill - RYL FNC FNC FNC
First to 5 Kills - RYL FNC FNC FNC
First to 10 Kills - RYL FNC FNC FNC
First Teamfight Win - RYL FNC FNC FNC
First Turret - RYL RYL RYL RYL
First Outer Turrets - RYL RYL RYL RYL
First Inner Turrets - RYL FNC RYL
First Inhibitor - RYL RYL FNC RYL
First Dragon - FNC FNC FNC RYL
Most Dragons - RYL FNC FNC RYL
First Baron - RYL RYL FNC RYL
First Dragon

6:04 - This is immediately after Jarvan tries to kill Elise mid, and she barely gets away. Elise is forced to flash and to back, Annie has expended 90% of her mana and her ignite summoner (making her mostly useless in a fight) and Fnatic, with the exception of Jarvan, are all moving out of base, having just shopped. Rumble also has his ultimate where as Shen does not. These factors put Fnactic in a superior dragon position if they would collapse and immediately take it. They would reach and kill dragon before Royal could effectively respond. (Also note Rumble has 26 cs).

6:34 - If Fnatic had made the call to dragon after Elise was forced to back, they could have been at dragon as a 5 man team for roughly 8-12s, enough time to kill it. Even if they did not have enough time, it would have been a 4v5 as Shen does not have his ultimate at this time. Instead, Jarvan farms mid and burn his mana, vastly reducing his fight effectiveness and Royal takes note of this.

6:47 - With Royal noting that Jarvan was low on mana and at half hp, they immediately set up vision around dragon. Seeing that Jarvan has backed, they immediately turn to start dragon.

6:55 - Royal have started dragon without hesitation. Jarvan is all the way back in base. Kayle has now hit 6, Shen is about to hit 6. Rumble begins to head towards dragon, having only gained 6 cs from his trip top.
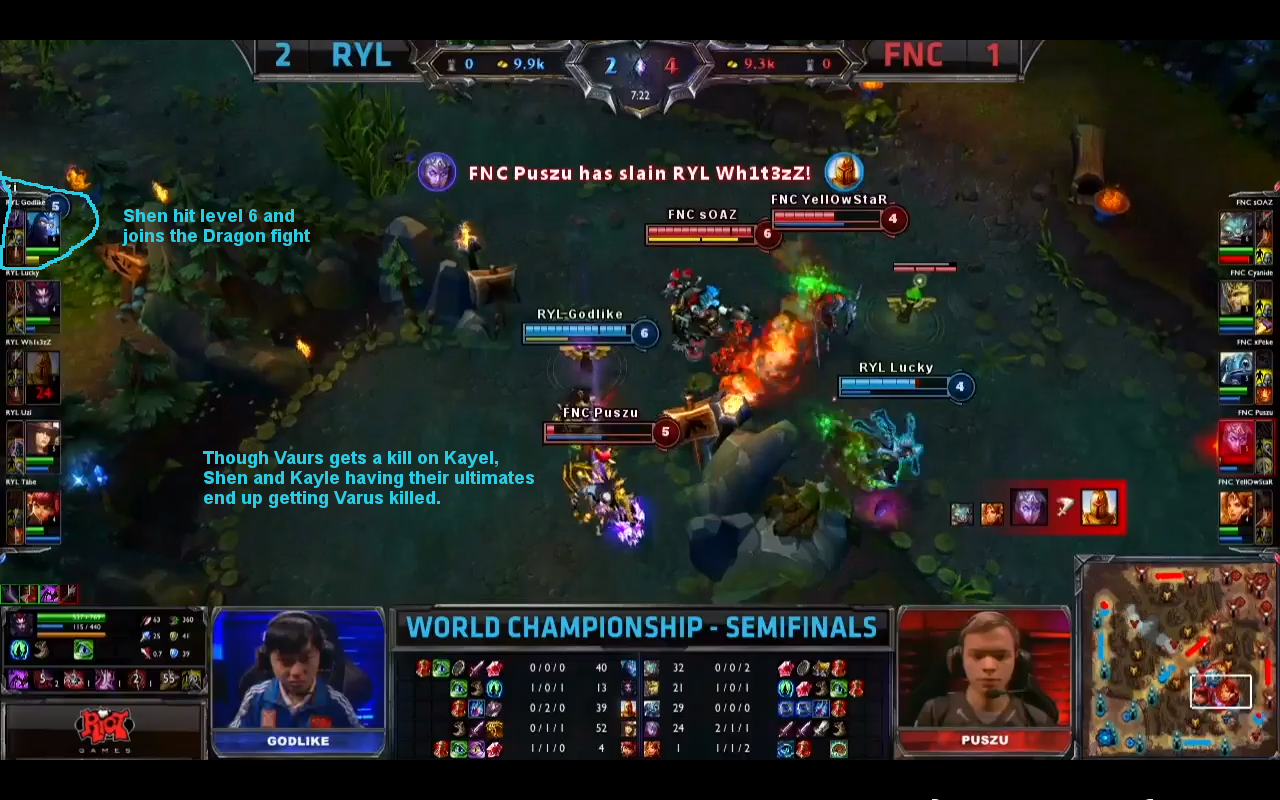
7:22 - Fight has broken out at Dragon after Royal have already secured it. Fnatic kill Kayle, but because Shen had just reached 6 and Kayle had been 6, their ultimates were enough to delay Kayle's death so that Royal could secure the kill on Varus.
Results - Fnatic do win the fight, but the kill score is 1 - 1 and Royal secured dragon, pulling them ahead from the engagement. Royal noticed that Jarvan was backing and that they would have an advantage and did not hesitate to go after Dragon. If instead, Fnatic had been proactive and headed towards dragon when Elise was forced to back, they would have been at an advantage to take it. Kayle and Shen would not have been 6, but Rumble would have been, leading to a massive 5v4 advantage for Fnatic. Instead, Fnatic get some minor farm. 6 cs on Rumble for his trip top, and a few cs for Jarvan farming mid. Fnatic did not capitalize on their opportunity, but Royal did and they come out on top for it.
Post First Dragon Fight

7:40 - After the fight at dragon, Fnatic come out on top even though the kill score was even. Elise is low on both HP and mana and cannot be useful in a defense situation. Fnatic have 4 members near the bottom tower while Cait heads mid and Shen heads top. Fnatic could and should at this point, push bottom. They would be able to take the turret uncontested and when Varus respawns he would be able to head middle to defend.

7:48 - Instead of pushing an objective after the fight, Rumble goes back to base an heads stop, Jarvan and Fizz take blue, and they leave Leona to farm bottom. This effectively takes their power play time and nullifies it. Instead of pushing for an objective that gives them global presence, they head back into laning phase mentality. Fnatic gain nothing from winning the previous fight.
Fizz Dies Middle

8:18 - Fizz attempts to make a play mid, but is caught by Annie and dies. Royal immediately respond by pushing mid with Shen and Kayle heading towards mid tower.

8:39 - Since Shen and Kayle collapsed to mid, Fnatic were unable to defend mid turret and Royal secure it, giving them a large advantage in vision control and map presence.
Blue Buff Posturing and 2nd Dragon


11:47 - 12:27 - With the mid turret down, Royal begin to take vision control of Fnatic's jungle. They notice that Varus is backing and with 3 people they force their way into Fnatic's jungle while Kayle pushes bottom lane towards the turret. The jungle dance goes on for a bit, but when Jarvan decides to head towards wraiths, letting the blue buff jungle go, Royal use their superior position and objective focus to collapse on bottom lane and take down the turret.

12:40 - With Royal grouped up after pushing bottom turret, they have the better position for dragon, which is going to respawn. Fnatic are divided, both by positioning and decision making. Leona/Varus/Jarvan posture around dragon while Fizz make no attempt to head that way. With Rumble so far away and the threat of Shen ultimate at dragon, Fnatic decide to let this dragon go, even though they don't act like it. Fizz heads towards wraiths, but decides against it, heads to posture around dragon, then decides against it again. Fizz could have just pushed mid, while Royal are distracted with dragon, and take the turret or at least put on a lot of damage.

13:10 - After being indecisive about dragon, Fizz returns to middle to clear out another creep wave. However, he still does no damage to Royal's mid turret, even though they are currently distracted by dragon. With no pressure on mid turret, Royal are free to take Fnatic's blue buff after dragon.
Result - Royal's superior pressuring and map positioning along with Fnatic's indecisiveness allow Royal to get 4 different objectives - Jungle control, Bottom Outer Turret, Dragon, and Fnatic's Blue Buff. Because Fnatic did not take this time to pressure anything, particularly mid turret, Royal gained these 4 objectives without any cost to them.
Top Lane Fight - 16:30

16:16 - With their objective focus, Royal start to group up towards the last outer turret of Fnatic. During this, Royal end up catching and killing Leona in the jungle. With Fizz bottom, Royal immediately collapse top for a 5v3 in their favor.

16:46 - While pushing the turret, Shen and Rumble die, trading 1 for 1. Even though Royal have lost 1 member already, they still continue to push the turret 4v2, even though they know Fizz is en-route. The bigger thing to note here, is that Leona DOES NOT head towards the fight and her team, but heads middle.

17:08 - Fnatic get 2 kills and come out of the fight very healthy and with Fizz/Jarvan ultimate still up. Now with a 5v3 advantage, Fnatic have two choices. First - They could 3v2 top turret (4v2 if Leona had headed top) or they could rush middle, meet up with Leona and Rumble and push middle. Unfortunately, Rumble decides to head bottom.

17:15 - Instead, Fnactic opt to back and shop.

17:38 - Caitlyn however, does not back, continuing to farm top lane. With Fnatic gone, she pushes top lane and at 18:14 she takes the top turret.
Results - Fnatic are able to turn around a bad situation. Effecively a 5v3 fight for top turret, Fnatic hold out until Fizz arrives and turn the fight around. Fnatic comes out with 2 kills and has a 5v3 advantage on the map. Unfortunately they do nothing with this advantage while Royal keep on the pressure and gain a turret. In the end Fnatic take 3 kills while Royal take 2 kills and a turret. If Fnatic has pressured their advantage after the fight, they could have been the one up a turret instead of Royal.
3rd Dragon

18:35 - Fnatic attempt to get a pick middle in a 3v5 situation. Unfortunately they target Kayle who along with Shen ultimate, easily survives the attempt. This could not come at a worse time. Dragon is spawning soon and Fnatic will not have 3 of their ultimates. Royal will pick up an easy Dragon. Fnatic should have waited till dragon to fight, as they have been repeatedly winning team-fights so far.
Mid-lane Teamfight - 19:53


24:18 - Fnatic win the team fight, and even though both sides are low, Varus is full hp and Leona is at half. With Royal having the lower HP bars, and Shen pushed out of the fight, Fnatic have the advantage. Fnatic have the positioning to push mid turret 4v3. If a fight were to engage, Leona could run defense and Jarvan has his ultimate coming up. At the least, Fnatic could trade kills and keep their advantage on the turret.

20:22 - Instead, Fnatic backs. Caitlyn however stays mid and farms the pushing waves, lessening the gold gain Fnatic acquired from the teamfight and pushes the creep pressure back towards Fnatic.
Blue Fight - 23:40


24:18 - Fnatic win the fight substantially. This time they do decide to push an objective, however this is mostly because they happen to be there. Fnatic have a decent sized wave and could push onward to the inner turret, especially in a 4v1 situation when Elise showed middle. Leaon and Fizz however, end up backing.
Dragon Fight 26:05


26:45 - Fnatic once again come out on top after a teamfight and this time substantially ahead. Fnatic push the inner bottom turret and take it out. If they had previously taken down the inner turret with their last win, they could have swung middle and gained a 4th turret and their 1st mid one. Barring that, this pressure after the fight was well done.
Mid-Fight 30:09


30:42 - Fnatic win the fight going 3 kills for 1 and successively take mid turret. While they have the numbers advantage, they still don't push the inner turret. Being fair, this is another case where doing so might put Baron at risk. However, neither Baron nor the inner turret are on Fnatic's mind at this moment. They do not push their current 4v2 at middle turret, and Varus/Rumble do not go back to base to heal for Baron (Rumble will die because of this in the next fight).
Baron Area Fight 31:38


Fnatic with yet another teamfight, this time near Baron Pit, getting the ace. If Rumble had healed after the previous engagement, then the fight would have been even more of a Fnatic win, with 3 or potentially 4 up. That didn't happen however, so lets look at what did and what Fnatic have for options. I believe that this fight is where Fnatic could have secured themselves the win.
Notables:
Jarvan and Varus are alive.
Varus is strong and has B.T. for lots of leech.
Baron is mere feet away.
There is a massive creep wave in bot lane.
Leona has 23s till respawn and has level 2 boots.
Elise has 33s till respawn and has level 1 boots.
Option 1 - Baron
I believe that this would have been the best option for Fnatic to take. Clearing the map of Baron would have removed it's threat and further increased Fnatic's fighting potential, even if it was only on a few members. At this point in the game, turrets are worth less as 1 good fight can lead to an inhibitor push or even a nexus push and having Baron siege/fight benefit would almost secure the next fight for Fnatic and would give them the confidence to, for the first time in this game, take the fight to Royal.
Jarvan and Varus could have split baron aggro back and forth, and Varus could have created a lot of tank time with his life leech. They could even delay a few seconds before starting so that they sustain less damage before Leona arrives. With Leona spawning 10s earlier than Elise and having the ability to purchase homeguard, she could have arrived at baron 15s+ earlier than her. Fnatic had a good 35-40s window to two-man Baron.
We won't actually know if they could have two manned it, but I believe that they could have started it, delayed for Leona, and finish it and get away before Royal could respond.
Option 2 - Push Top
This is the option that Fnatic chose, but they hesitated a few seconds which turns out to be crucial. Jarvan and Varus head top and take the inner top turret. The massive creep wave there would have taken the turret without them though. Unfortunately, Jarvan decides to back, a huge mistake. Varus continues to push and takes down the top lane inhibitor turret and moves on to the inhibitor. Varus alone is not enough though and has to back off before it is finished.
If Jarvan had stayed, the extra damage and AS he provides should have been enough to take out the inhibitor.
Option 3 - Push Mid
Not really a better option, but just one. Fnatic could have pushed mid, but it would have gotten them the least value.
Results - Because Fnatic pushed Top lane and did not commit to getting the inhibitor, they effectively only gained 1 turret as the result of this teamfight. Unfortunately, throughout the game Fnatic has not been putting the pressure on Royal at all. The extra inhib turret take-down only net's them the global gold, which is not too effective this late in the game. Committing to the inhibitor or choosing instead to take down Baron would have created pressure on Royal that Fnatic so desperately needed.
Royal Catches Jarvan - 35:08

35:08 - This is were the game really ends. Annie makes an amazing play and catches Jarvan and Rumble away from their team. Because Royal are OBJECTIVE FOCUSED, they are group up while Fnatic are not, a common problem throughout this match. Royal get a clean kill on Jarvan and then proceed to win their first team fight.

36:00 - After winning their first team fight, Royal show no hesitation and push through middle all the way to take Fnatic's inhibitor. Granted that this is a much easier decision than most Fnatic has had to made, but the difference is Royal makes it WITHOUT hesitation. Before the fight began they knew what they were after.
At this point the game is 90% over. Royal have gained their first lead, won their first teamfight, and have generated a ton of map pressure by taking Fnatic's inhibitor. Uzi has reached the point where he is almost unstoppable, out-scaling Varus. Royal has gained a Royal Flush and the only way to lose is to fold at this point. For the rest of the game, Royal plays it by the books, slowly pushing with lane advantage and taking Baron and lanes while Fnatic is forced on the defensive.
Synopsis:
Even though Fnatic wins every team fight until the 35 minute mark, they never put pressure onto Royal. Throughout the entirety of this match, Royal are constantly looking for objectives. Their fights have purpose and Royal has a plan for every move they make. Even though this only pans out for them in the beginning of the game, they do not cease. They constantly pressure Fnatic and in return Fnatic only play re-actively, not proactively. Throughout the series, Royal do not hesitate to pressure even the smallest advantage. Anytime they have a numbers or position advantage they put pressure onto Fnatic. This fourth game shows that Fnatic did not do the same. Even while winning every team fight, Fnatic does not push objectives to force them.
Fnatic's reactive play, even while winning, fell short of Royal's proactive play. Fnatic needed to show aggression and push their numbers advantage onto objectives, but they did not. As we have heard in the past, winning a team fight but not getting an objective after means nothing. This game exemplified that more than any other.
There is one thing I found particularly disappointing though. Consistently, Fnatic was winning team-fights and getting kill leads, however, they were not doing very much with these. This was a constant problem for Fnatic throughout all four games and I wanted to take a deeper look into why Fnatic lost the series, even while winning most of the team-fights.
Though there were multiple problems - losing lanes, cs numbers, vision control, etc - I feel that Fnatics biggest problem was their decision making after team-fights and their general lack of objective control throughout the series. Aside from Game 1, Fnactic had the kill and teamfight leads, but even so, in all four games Royal was the first to secure the primary map/vision control objectives, the first turret and the outer turrets. I feel that Game 4 exemplifies this problem best, with Fnatic's huge kill lead but lack of doing anything with it, so I will be using Game 4 as an example.
Game 1 Game 2 Game 3 Game 4
First Kill - RYL FNC FNC FNC
First to 5 Kills - RYL FNC FNC FNC
First to 10 Kills - RYL FNC FNC FNC
First Teamfight Win - RYL FNC FNC FNC
First Turret - RYL RYL RYL RYL
First Outer Turrets - RYL RYL RYL RYL
First Inner Turrets - RYL FNC RYL
First Inhibitor - RYL RYL FNC RYL
First Dragon - FNC FNC FNC RYL
Most Dragons - RYL FNC FNC RYL
First Baron - RYL RYL FNC RYL
First Dragon
6:04 - This is immediately after Jarvan tries to kill Elise mid, and she barely gets away. Elise is forced to flash and to back, Annie has expended 90% of her mana and her ignite summoner (making her mostly useless in a fight) and Fnatic, with the exception of Jarvan, are all moving out of base, having just shopped. Rumble also has his ultimate where as Shen does not. These factors put Fnactic in a superior dragon position if they would collapse and immediately take it. They would reach and kill dragon before Royal could effectively respond. (Also note Rumble has 26 cs).
6:34 - If Fnatic had made the call to dragon after Elise was forced to back, they could have been at dragon as a 5 man team for roughly 8-12s, enough time to kill it. Even if they did not have enough time, it would have been a 4v5 as Shen does not have his ultimate at this time. Instead, Jarvan farms mid and burn his mana, vastly reducing his fight effectiveness and Royal takes note of this.
6:47 - With Royal noting that Jarvan was low on mana and at half hp, they immediately set up vision around dragon. Seeing that Jarvan has backed, they immediately turn to start dragon.
6:55 - Royal have started dragon without hesitation. Jarvan is all the way back in base. Kayle has now hit 6, Shen is about to hit 6. Rumble begins to head towards dragon, having only gained 6 cs from his trip top.
7:22 - Fight has broken out at Dragon after Royal have already secured it. Fnatic kill Kayle, but because Shen had just reached 6 and Kayle had been 6, their ultimates were enough to delay Kayle's death so that Royal could secure the kill on Varus.
Results - Fnatic do win the fight, but the kill score is 1 - 1 and Royal secured dragon, pulling them ahead from the engagement. Royal noticed that Jarvan was backing and that they would have an advantage and did not hesitate to go after Dragon. If instead, Fnatic had been proactive and headed towards dragon when Elise was forced to back, they would have been at an advantage to take it. Kayle and Shen would not have been 6, but Rumble would have been, leading to a massive 5v4 advantage for Fnatic. Instead, Fnatic get some minor farm. 6 cs on Rumble for his trip top, and a few cs for Jarvan farming mid. Fnatic did not capitalize on their opportunity, but Royal did and they come out on top for it.
Post First Dragon Fight
7:40 - After the fight at dragon, Fnatic come out on top even though the kill score was even. Elise is low on both HP and mana and cannot be useful in a defense situation. Fnatic have 4 members near the bottom tower while Cait heads mid and Shen heads top. Fnatic could and should at this point, push bottom. They would be able to take the turret uncontested and when Varus respawns he would be able to head middle to defend.
7:48 - Instead of pushing an objective after the fight, Rumble goes back to base an heads stop, Jarvan and Fizz take blue, and they leave Leona to farm bottom. This effectively takes their power play time and nullifies it. Instead of pushing for an objective that gives them global presence, they head back into laning phase mentality. Fnatic gain nothing from winning the previous fight.
Fizz Dies Middle
8:18 - Fizz attempts to make a play mid, but is caught by Annie and dies. Royal immediately respond by pushing mid with Shen and Kayle heading towards mid tower.
8:39 - Since Shen and Kayle collapsed to mid, Fnatic were unable to defend mid turret and Royal secure it, giving them a large advantage in vision control and map presence.
Blue Buff Posturing and 2nd Dragon
11:47 - 12:27 - With the mid turret down, Royal begin to take vision control of Fnatic's jungle. They notice that Varus is backing and with 3 people they force their way into Fnatic's jungle while Kayle pushes bottom lane towards the turret. The jungle dance goes on for a bit, but when Jarvan decides to head towards wraiths, letting the blue buff jungle go, Royal use their superior position and objective focus to collapse on bottom lane and take down the turret.
12:40 - With Royal grouped up after pushing bottom turret, they have the better position for dragon, which is going to respawn. Fnatic are divided, both by positioning and decision making. Leona/Varus/Jarvan posture around dragon while Fizz make no attempt to head that way. With Rumble so far away and the threat of Shen ultimate at dragon, Fnatic decide to let this dragon go, even though they don't act like it. Fizz heads towards wraiths, but decides against it, heads to posture around dragon, then decides against it again. Fizz could have just pushed mid, while Royal are distracted with dragon, and take the turret or at least put on a lot of damage.
13:10 - After being indecisive about dragon, Fizz returns to middle to clear out another creep wave. However, he still does no damage to Royal's mid turret, even though they are currently distracted by dragon. With no pressure on mid turret, Royal are free to take Fnatic's blue buff after dragon.
Result - Royal's superior pressuring and map positioning along with Fnatic's indecisiveness allow Royal to get 4 different objectives - Jungle control, Bottom Outer Turret, Dragon, and Fnatic's Blue Buff. Because Fnatic did not take this time to pressure anything, particularly mid turret, Royal gained these 4 objectives without any cost to them.
Top Lane Fight - 16:30
16:16 - With their objective focus, Royal start to group up towards the last outer turret of Fnatic. During this, Royal end up catching and killing Leona in the jungle. With Fizz bottom, Royal immediately collapse top for a 5v3 in their favor.
16:46 - While pushing the turret, Shen and Rumble die, trading 1 for 1. Even though Royal have lost 1 member already, they still continue to push the turret 4v2, even though they know Fizz is en-route. The bigger thing to note here, is that Leona DOES NOT head towards the fight and her team, but heads middle.
17:08 - Fnatic get 2 kills and come out of the fight very healthy and with Fizz/Jarvan ultimate still up. Now with a 5v3 advantage, Fnatic have two choices. First - They could 3v2 top turret (4v2 if Leona had headed top) or they could rush middle, meet up with Leona and Rumble and push middle. Unfortunately, Rumble decides to head bottom.
17:15 - Instead, Fnactic opt to back and shop.
17:38 - Caitlyn however, does not back, continuing to farm top lane. With Fnatic gone, she pushes top lane and at 18:14 she takes the top turret.
Results - Fnatic are able to turn around a bad situation. Effecively a 5v3 fight for top turret, Fnatic hold out until Fizz arrives and turn the fight around. Fnatic comes out with 2 kills and has a 5v3 advantage on the map. Unfortunately they do nothing with this advantage while Royal keep on the pressure and gain a turret. In the end Fnatic take 3 kills while Royal take 2 kills and a turret. If Fnatic has pressured their advantage after the fight, they could have been the one up a turret instead of Royal.
3rd Dragon
18:35 - Fnatic attempt to get a pick middle in a 3v5 situation. Unfortunately they target Kayle who along with Shen ultimate, easily survives the attempt. This could not come at a worse time. Dragon is spawning soon and Fnatic will not have 3 of their ultimates. Royal will pick up an easy Dragon. Fnatic should have waited till dragon to fight, as they have been repeatedly winning team-fights so far.
Mid-lane Teamfight - 19:53
24:18 - Fnatic win the team fight, and even though both sides are low, Varus is full hp and Leona is at half. With Royal having the lower HP bars, and Shen pushed out of the fight, Fnatic have the advantage. Fnatic have the positioning to push mid turret 4v3. If a fight were to engage, Leona could run defense and Jarvan has his ultimate coming up. At the least, Fnatic could trade kills and keep their advantage on the turret.
20:22 - Instead, Fnatic backs. Caitlyn however stays mid and farms the pushing waves, lessening the gold gain Fnatic acquired from the teamfight and pushes the creep pressure back towards Fnatic.
Blue Fight - 23:40
24:18 - Fnatic win the fight substantially. This time they do decide to push an objective, however this is mostly because they happen to be there. Fnatic have a decent sized wave and could push onward to the inner turret, especially in a 4v1 situation when Elise showed middle. Leaon and Fizz however, end up backing.
Dragon Fight 26:05
26:45 - Fnatic once again come out on top after a teamfight and this time substantially ahead. Fnatic push the inner bottom turret and take it out. If they had previously taken down the inner turret with their last win, they could have swung middle and gained a 4th turret and their 1st mid one. Barring that, this pressure after the fight was well done.
Mid-Fight 30:09
30:42 - Fnatic win the fight going 3 kills for 1 and successively take mid turret. While they have the numbers advantage, they still don't push the inner turret. Being fair, this is another case where doing so might put Baron at risk. However, neither Baron nor the inner turret are on Fnatic's mind at this moment. They do not push their current 4v2 at middle turret, and Varus/Rumble do not go back to base to heal for Baron (Rumble will die because of this in the next fight).
Baron Area Fight 31:38
Fnatic with yet another teamfight, this time near Baron Pit, getting the ace. If Rumble had healed after the previous engagement, then the fight would have been even more of a Fnatic win, with 3 or potentially 4 up. That didn't happen however, so lets look at what did and what Fnatic have for options. I believe that this fight is where Fnatic could have secured themselves the win.
Notables:
Jarvan and Varus are alive.
Varus is strong and has B.T. for lots of leech.
Baron is mere feet away.
There is a massive creep wave in bot lane.
Leona has 23s till respawn and has level 2 boots.
Elise has 33s till respawn and has level 1 boots.
Option 1 - Baron
I believe that this would have been the best option for Fnatic to take. Clearing the map of Baron would have removed it's threat and further increased Fnatic's fighting potential, even if it was only on a few members. At this point in the game, turrets are worth less as 1 good fight can lead to an inhibitor push or even a nexus push and having Baron siege/fight benefit would almost secure the next fight for Fnatic and would give them the confidence to, for the first time in this game, take the fight to Royal.
Jarvan and Varus could have split baron aggro back and forth, and Varus could have created a lot of tank time with his life leech. They could even delay a few seconds before starting so that they sustain less damage before Leona arrives. With Leona spawning 10s earlier than Elise and having the ability to purchase homeguard, she could have arrived at baron 15s+ earlier than her. Fnatic had a good 35-40s window to two-man Baron.
We won't actually know if they could have two manned it, but I believe that they could have started it, delayed for Leona, and finish it and get away before Royal could respond.
Option 2 - Push Top
This is the option that Fnatic chose, but they hesitated a few seconds which turns out to be crucial. Jarvan and Varus head top and take the inner top turret. The massive creep wave there would have taken the turret without them though. Unfortunately, Jarvan decides to back, a huge mistake. Varus continues to push and takes down the top lane inhibitor turret and moves on to the inhibitor. Varus alone is not enough though and has to back off before it is finished.
If Jarvan had stayed, the extra damage and AS he provides should have been enough to take out the inhibitor.
Option 3 - Push Mid
Not really a better option, but just one. Fnatic could have pushed mid, but it would have gotten them the least value.
Results - Because Fnatic pushed Top lane and did not commit to getting the inhibitor, they effectively only gained 1 turret as the result of this teamfight. Unfortunately, throughout the game Fnatic has not been putting the pressure on Royal at all. The extra inhib turret take-down only net's them the global gold, which is not too effective this late in the game. Committing to the inhibitor or choosing instead to take down Baron would have created pressure on Royal that Fnatic so desperately needed.
Royal Catches Jarvan - 35:08
35:08 - This is were the game really ends. Annie makes an amazing play and catches Jarvan and Rumble away from their team. Because Royal are OBJECTIVE FOCUSED, they are group up while Fnatic are not, a common problem throughout this match. Royal get a clean kill on Jarvan and then proceed to win their first team fight.
36:00 - After winning their first team fight, Royal show no hesitation and push through middle all the way to take Fnatic's inhibitor. Granted that this is a much easier decision than most Fnatic has had to made, but the difference is Royal makes it WITHOUT hesitation. Before the fight began they knew what they were after.
At this point the game is 90% over. Royal have gained their first lead, won their first teamfight, and have generated a ton of map pressure by taking Fnatic's inhibitor. Uzi has reached the point where he is almost unstoppable, out-scaling Varus. Royal has gained a Royal Flush and the only way to lose is to fold at this point. For the rest of the game, Royal plays it by the books, slowly pushing with lane advantage and taking Baron and lanes while Fnatic is forced on the defensive.
Synopsis:
Even though Fnatic wins every team fight until the 35 minute mark, they never put pressure onto Royal. Throughout the entirety of this match, Royal are constantly looking for objectives. Their fights have purpose and Royal has a plan for every move they make. Even though this only pans out for them in the beginning of the game, they do not cease. They constantly pressure Fnatic and in return Fnatic only play re-actively, not proactively. Throughout the series, Royal do not hesitate to pressure even the smallest advantage. Anytime they have a numbers or position advantage they put pressure onto Fnatic. This fourth game shows that Fnatic did not do the same. Even while winning every team fight, Fnatic does not push objectives to force them.
Fnatic's reactive play, even while winning, fell short of Royal's proactive play. Fnatic needed to show aggression and push their numbers advantage onto objectives, but they did not. As we have heard in the past, winning a team fight but not getting an objective after means nothing. This game exemplified that more than any other.
Tuesday, September 17, 2013
Banner of Command - Analysis and Ideas for Change
The problem with Banner of Command is
that it serves no purpose to players. In its current state of being
Banner of Command is really just a toy for players to mess around
with and ultimate adds little actual benefit to players.
Let's take a quick look at the stats.
Banner of Command provides:
40 AP
30 Armor
10% CDR
10 HP/5
2360 Gold
Let's compare it to
Seekers Armguard:
20(35) AP
30(45) Armor
1160 Gold
Picking up Seekers Armguard gives up
more armor after a few creep waves and almost the same AP, but that
also leaves us with 1200 extra gold to spend. With that extra 1200
gold we could buy several items that would push us far above the base
stats of Banner of Command.
Codex - 820G
30 AP
10% CDR
Emblem of Valor - 650G
20 Armor
7 HP/5
Hextech Revolver - 1200G
40 AP
12% Spell Vamp (Generally providing
more regen than Banners HP/5)
Or one could just save up for a
Needlessly Large Rod to build into Zhonya's for 400G more than
Banner.
Banner of Command has comparatively
weak base stats and bad defensive timing compared to the Seeker's
Armguard at less than half the cost. On top of this, Banner of
Command is a fully upgraded item, taking up a slot with very sub-par
base stats. So, seeing that Banner of Commands gold cost is not
within its base stats, there is a massive amount of weight being
applied to both it's passive and active. Lets take a look at them
and why they are ineffective in their current state.
Banner of Command Passive -
10 HP/5
15% Damage to Minions
Let's assume you have a full creep wave
including a siege minion. And we'll place it at the 21 minute mark
for creep damage calculations.
Combined Creep Damage - 3 Melee, 3
Ranged, 1 Siege
229 AD Damage
195 AD Damage to Champions
344 AD Damage to Turrets
With the Passive of Banner of Command
+34 263 AD Damage
+29 224 AD Damage to Champions
+51 395 AD Damage to Turrets
If we assume turrets are running around
70 armor and Champions around 100, then we get.
+15 AD Damage to Champions
+30 AD Damage to Turrets
These numbers aren't too bad, providing
close to the worth of a Pickaxe to player in an optimal situation.
However, very rarely does this occur. Creeps are easy to kill, often
at this point getting instantly killed by AP mid or at least close to
it. With each creep that dies, the value of this passive goes down
and down. It's greatest use would be against a tower, during a split
push, when left alone. In this case, that passive of Banner of
Command would in handy. We can estimate that over the course of a
full wave only being attacked by the tower, that the extra damage
would be somewhere around 150-250 to a tower, a solid amount.
Against champions this is much harder to determine, but we can assume
it will be much less significant as the uptime of minions attacking
creeps is normally pretty low and hard to predict outside of the
early laning phase. Even if we consider it to contribute a healthy
100 damage (that's 6-7 attacks from each creep in the wave), the
value of that passive compared to a pickaxe pickup (which would
contribute guaranteed damage) is far far less.
As we can see, the value of Banner of
Command's passive is fairly low, situation dependent, and unreliable.
Personally, I'd value it around 200 gold, but that's just my
opinion. So what accounts for the high Gold Cost of Banner compared
to other similar items. It's Active. Let's take a look at it.
Banner of Command Active -
+500 HP
+.5 AS
+40 Armor
This is actually a very significant
difference. The 500 hp and the 40 armor almost if not more than
double the Effective HP of Siege Minions. Adding on the 30% less
damage they receive from turrets and these beefed up Siege Minions
can take a lot of tower hits. If left alone, a single minion wave
with one of these in it can deal 1/4 to 1/3 of a towers HP. With the
right timing this can be pretty significant. However, situations
where the creeps are left alone like this do not happen too often.
Let's look at two other situations and then at the most optimal.
Situation 1: 5 Man Sieges
There is not much to say about the
active in this situation other than it is extremely sub par. Since
it does not provide any MR, only the 500 HP affects casters, at the
point of 5 man sieges this is roughly 2 extra spell casts. If one or
two people would normally nuke down the creep wave, having 5
defending makes the impact of this HP increase less effective. Adding
on top of that the ADC damage will further decrease the extra time
the siege minion will be alive. At most, I'd wager that in a 5 man
push situation, this active would allow your ADC 1-2 extra shots on
the turret for that wave. At a 3 minute cooldown, this is pretty
insignificant. During a 5 man dive, the benefit would be even less,
as the minion will not take turret aggro, and the .5 AS increase is
fairly negligible after armor/hero reductions.
Situation 2: Split Push
In a split push situation, the active
becomes much more useful. The AS bonus and especially the Effective
Health increase will allow a split pusher in a 1v1 situation to apply
significantly more damage to a turret. This is especially true in
tank vs tank split push situations due to the enemy being slower at
killing the boosted minion, while be less true against more damage
oriented split pushers. However, there is a large downside to this.
By picking up Banner of Command you have dedicated a large amount of
gold into this active, making you weaker personally than you could
have been if you spent the gold differently. This most likely means,
that if they opponent choose to fight you, you will lose, as the
active is unlikely to help you in any significant or reliable manner
against champions. Being able to be 1v1'ed easily, effectively
cancels out your split pushing ability, so while Banner of Command's
active is more significant in a split push, opting into Banner of
Command is detrimental to your split pushing ability.
Optimal Situation:
In my opinion the optimal situation for
using Banner of Command's active, is when you are able to prevent the
enemy from being able to dedicate any resources to stop the buffed
minion. For example, using the active from base, to send the minion
down the lane opposite from the one your team will be pushing. This
is the only situation in which the active has a chance of shining.
Superbly timed, using it this way has to potential to result in a
turret kill, in extreme cases, maybe even two. The major problem
with this situation though, is the immense amount of logistics it
requires. Let's take a look.
Creep Wave Timing - Using the active is
limited to Siege Minions. Therefore your opportunities to employ
this strategy and make effective use out of the active are limited to
1:30 intervals.
Split Pushers and Teleport - If even
one champion is in the lane that you use this active on, its
effectiveness drops drastically. If you cannot force the split
pushing champion out of lane in time to react to your 5 man push in
the opposite lane, then your creep split push attempt falls to
pieces. This forces teams to HAVE to make a move even if one is not
available, or having the opt in to Banner of Command be detrimental.
Positioning - you must be in the proper
place at the proper time to effectively utilize. This makes your map
movements predictable and any plan to use this active optimally
dictates when the player(s) must be in position. Opportunities can
rarely be reacted to and seized by this active.
While at first, it may not seem
impossible, remember that the opposing team is going to
unintentionally and possibly intentionally hampering your ability to
pull of this optimal strategy. If your turret is being pushed, or
you are currently pushing a turret, you cannot simply back out of
your current action or required action to use the active. While you
can time your own actions, you cannot time the actions of the other
team. Even if you are able to manipulate them into the timing and
situation that you want, the reward you will get from the amount of
resources required seems hardly worth it.
So, as Banner of Command, in its
current form, is a sub par item in terms of stats and the active is
too lackluster to account for the stat gold sink that Banner of
Command is. What can we do to improve its viability as an item and
potentially as a strategy?
First, its gold cost and base stats
need to be looked at. Making this item more appealing outside of its
active would be the start of improving Banner of Command. How
exactly, to make changes to its base stats though, will depend on how
we want to define the purpose of its active. Split Push Power (alone
or with champions)? Combat Related? Siege Power? Group effectiveness
vs. Solo effectiveness. Here are my ideas.
Note - In all purpose I feel that
requiring the siege minion should be removed. However, having one
could provide extra benefit.
Creep Split Push -
Active: with this purpose in mind, it
would best be suited to being a globally targeted ability X number of
creeps near the target location would be either upgraded or buffed,
priority falling onto siege minions. A small HP bonus could allow
each creep buffed to take 1 more tower hit, and damage boosts would
help take down turrets. Against an undefended turret (no creeps
defending either) and with a siege minion, this active should
increase the minions damage to the turret by 25-45%. So if they
would have dealt 1/4 of the towers hp, a well timed use of this would
increase it to 1/3. Gaining gold from buffed creeps kills could also
remain.
In this role, Banner of Commands
primary purpose would be to give your creeps a way to push without a
Champion needing to be in the lane. As the item's purpose would be to
cause an effect on the map without champion involvement, its base
stats should most likely change to something more neutral/utility
oriented. Having another HP/CDR item choice would be nice,
especially if it came with a little bit of armor.
Siege Power -
Active: in this role, Banner of
Command's active would provide a massive defensive bonus to your
minions in a large area around you for a short period of time. In
essence, using the active would made your minions nearly or
completely invulnerable to champions (turrets would be unaffected)
for 3-4 seconds. This would allow Banner of Command to provide a
small window of siege power play for your team. Guaranteeing turret
damage by preventing your minion wave from being instantly nuked
down.
As for the base stats, they would stay
relatively the same, but with higher values. AP/CDR/AR are a unique
combination and provides a choice in item pickup. By increasing both
the gold cost and AP value, Banner of Command could be turned into a
more late game item, and further it's Siege Power Potential.
Split Push -
Passive/Active: turning Banner of
Command into a split push would come in two parts in my opinion.
Adding in a small passive to increase wave clear speed would be
necessary. I would give it something like, [on hit, chain lighting
will hit up to 3 other minions, dealing 10% of your AD]. As for the
Active, there are two possibilities in my mind. The First would link
you to X number of surrounding creeps, redirecting 15-20% of the
damage dealt to you to those creeps for 3s. This would give you split
push safety while being counter-able by being able to burst down the
wave of creeps. The 2nd idea for the active would increase your
AD/AP based on the number of nearby creeps, up to 5. This would give
you some dueling potential while split pushing.
The base stats could be done in an AP
or AD manner. For AP, I'd go with a solid amount, say 65-80 and some
HP, potentially with some MP/5 thrown in as well. In and AD version,
I'd run with AS/HP/CDR from to accentuate the split push power and
safety.
Combat Oriented -
Active: This one I think would be neat,
though it might not be as viable as the others. In this version,
using the active would give you "control" of all nearby
minions. For 5-7 seconds all nearby creeps would gain a damage boost
and would attack the target you attack with your AA's (like Champion
creatures). This would run with the minion central theme of Banner
of Commands active, and give the player reliable combat potential
from its use. The minions would also grant gold for their kills
while under this effect.
As for base stats, this version would
be AD oriented, primarily ADC/Fighters. AD primarily followed by AS
and potentially some Armor. Useful for going toe to toe with other
champions in 1v1 or skirmish situations.
And, I'm finally done! I always love
unique ideas and Banner of Command is one of them. I'd like to keep
its minion oriented active, but switch it into a more viable place
while increasing the base stats of Banner of Command to stop it from
being a sub-par buy.
Sunday, September 15, 2013
LoLByTheNumbers - A Look at Worlds
Greetings
fellow Summoners,
The
World Championship is upon us with the first of the group stage
matches underway. So what can we expect during the course of the
World's, and what can we expect from each team? After having watched
all 92 regionals matches and doing some stat taking, I'd like the
share with you a few things I noticed.
Sorry
its a bit late as the Group stages have started, wanted this to be up
yesterday, but life got in the way.
Combined
Regional Stats
For
those of you interested in the statistics of the regional qualifiers,
all of the data I've collected can be found here.
.ODS
files up currently, Excel will be up shortly.
Champion
List – Contains Pick/Ban, Win/Loss percentage, KDA and avg
KDA as well as Champion Picks and KDA/avg KDA of each player.
Items –
Contains (primarily) finished/intermediate items picked by X role for
each game as well as the total pick-up percentage per game. Broken
down into individual games, teams, and champions.
Objective
Control – Contains a few major objective points found in
most/each match, the times they were taken, and the win rates
associated with controlling that objective.
Things
to watch for
Outside
of the normal, high-skilled play that is associated with the
professional teams. There are a few things to watch out for. If you
regularly watch the LCS and the professional scene you probably
already know these, but if you are a bit newer to the scene, here are
a few things to keep your eye on.
Trinity
Force
Just
a small note, its back and in full force. Expect to see it, and
Trinity Force champions making a huge showing. With only two of the
Regional Qualifiers being played on the buffed Trinity Force patch,
several new champions for the various regions teams may be coming
out.
Contested
Champs
Even
though a total of 81 champions were picked/banned throughout the
course of the Regional Qualifiers, there are some very highly
contested champions among all the regions.
Champion
– Pick/Ban Rates
Shen
– 81 – 88.04%
Thresh
– 77 – 83.70%
Jarvan
– 73 – 79.35%
Zed
– 70 – 76.09%
Ahri
– 66 – 71.74%
Sona
– 63 – 68.48%
Zac
– 63 – 68.48%
Zyra
– 57 – 61.96%
Elise
– 54 – 61.96%
Ezreal
– 53 – 57.61%
Lee
Sin – 52 – 56.52%
Caitlyn
– 51 – 55.43%
Orianna
– 48 – 52.17%
During
the regionals, these were the champions that were either picked or
banned in over half the matches. With the exception of Sona and Zyra
(rarely
banned but picked a lot due to being the primary supports currently),
these champions are very highly contested and often banned out or
taken as first or second picks. You can expect to see a lot of
decision making and mindgames happening during the pick and ban
phases in an attempt to secure these champions for their own team or
deny them from the opposing team.
Fast
tower pushes/trades
During
the beginning of the summer split, we saw a lot of very fast tower
pushing with the first outer tower falling around 3:30 and sometimes
the following inner turret by 5:30. Since the buff to the outer
towers though, this has become a lot less likely. But, it does still
happen, especially in the Asian scene. Anytime you see a 2v1 lane at
the start of the match (especially with Caitlyn), there is going to
be a high chance of the jungler moving to the 2v1 lane and fast
pushing towers. Most teams have seen this kind of play before, and
will most likely react appropriately by doing the same in the
opposing lane, but with this type of strategy having mostly died out
over a month ago, it may be possible that a team gets caught of guard
by this. Regardless, in the event of extremely fast turret
pushes/trades, expect to see the rest of the game accelerated and
laning phases ending shortly after.
Champion
Combos
Some very potent
champion combinations have cropped up over the past few weeks or
months and we can be sure to expect them during the World
Championship. If you see them picked up, be prepared to watch some
pretty destructive plays coming from the combos.
+ Ashe + Zyra:
Probably the most well known combo and made popular by Cloud 9, the
Ashe/Zyra combination brings a ton of control from the bot lane, a
rarely known for the control they bring. Inside of the lane, the
long poke range provide good harassment, as well as the ability to
both engage and disengage with 4 different types of CC (Stun,
Knock-up, Snare, and Slow) provide this combo with a lot of safety
and kill potential. Outside of the lane, the CC that Ashe/Zyra
provide allow for more pure damage champions to come from the other
lanes. With high pick potential from Ashe's ultimate and the
CC/Protection/Zone Potential of Zyra, this bot lane combo allows
teams to almost always choose how and when to fight.
Variations of this
combination include replacing Ashe with Varus, or Zyra with Sona.
Though not as effective, they still provide a large amount of control
from the bottom lane.
+
Vi + Ahri/Shen: Recently
picking up steam, particularly in the Korean scene, Vi + Ahri/Shen
have been causing huge amounts of problems for the opposing team.
Vi's ultimate is guaranteed to hit here target and with the extra
range she can get from her Q Dash, she can almost always reach the
high priority targets in any fight. This long range, guaranteed
crowd control allows Vi to setup her teammates. This is hugely
effective with Ahri and Shen. Ahri, with her ult, is able to easily
follow Vi to her target. With her targeted CC'ed Ahri is guaranteed
to land her charm on her target, resulting in her entire combo
hitting on top of Vi's damage. 99% of the time this will result in
the targets death. Shen, as the other combo with Vi, is also
extremely effective. Shen will Ult onto Vi as she is dashing in.
The result is having Shen teleported into the opposing teams back
line and following up Vi's CC with even more CC.
+
Ori + Delivery System: Another
well known combo and seen time and time again throughout the world,
is the Ball Delivery System. Basically it consists of Orianna + any
champion that can cover a very large distance quickly while holding
onto Orianna's ball. This allows fast and easy positioning of
Orianna's ball into the middle of the opposing team for her Ultimate.
Many champions work well for this, though some of the more notable
ones are Jarvan, Zac, Vi, and Nocturne with their long range engages.
Regions,
Teams, and Differences
China
The
Chinese League of Legends scene can be summarized in one word,
aggresion.
+
See Kill, Get Kill Mentality - If there is any chance for a kill, the
Chinese players will go for it, even if it means committing
themselves to their own death. This often puts the players in very
high risk situations. Rarely faced with defensive teams in their
region, Teams OMG and Royal may potentially set themselves up to get
their aggression countered. However, if they are able to draw other
teams into their style of play, they will most certainly come out on
top.
+
Low Warding – The Chinese region seems plagued by low warding,
especially when you compare them to NA/EU regions in which often
times you will see 7+ wards out per team at one time.
+
Teir 2 Turret Trades – A common tactic in China, often times in 2v1
lanes, not only will the outer turrets be traded by 3:30, often times
the inner turrets will fall by 5:30 as well. Beyond that, on a rare
occasion even the Inhibitors have been traded during that first
turret push and have fallen before the 9 minute mark. No other
region has ever done this, so they need to be prepared for the
Chinese teams to not back off from the intial pushes.
+
Hectic Play – While controlled and understood by the teams, most of
the games from the Chinese region feel extremly Hectic. More often
than not a fight resulting in a kill is going on, someone is out
getting caught, a tower is being pushed, or a gank set up. Things
are always happening in the games, but just as often as this
accomplishes beneficial goals, it also causes teams to put themselves
into bad positions and be punished for it.
Team
OMG -
+ Yorick Jungle – Team
OMG love to play Yorick Jungle. A very unique pick-up, he does
extremely well at early turret/objective pressure. He is also a very
strong duelist in the jungle, potentially the strongest and is played
with a very strong counter jungle preference. If Yorick makes it way
into the hands of OMG, expect their jungler to bully the opposing
teams jungler and to have high presence in objective play. However,
do not expect him to be ganking very often, as his ganks have little
effectiveness. Team OMG love to combo this with Renekton Top so that
they can use Yoricks ultimate on Renekton after he has used his
Ultimate, so that there are two lizards running around with the AOE
damage.
+ Very Strong Orianna –
If Team OMG's mid laner gets his hands on Orianna, be prepared to see
some extremely strong play out of him. His Orianna is one of the
best in the world and though I would love to see it played, I would
prioritize target banning this champion against them.
+ Mundo Top – Picking
up a little bit of steam lately, Team OMG will run Mundo as a top
laner. Only seen in the Korean scene as well, most region's teams
will not have played against this. Watch out for this pickup and
enjoy watching something most unplayed to great effect.
Team
Royal -
+ Support Annie – Team
Royal's support player loves to play Annie and is highly respected at
it by his region. More often than not, Annie draws a ban from the
opposing teams and when she does not, Royal will pick her up
immediately. If Royal gets their hands on Annie, you can expect to
see the ADC/Support combo run in the mid lane. This allows Annie to
have the greatest zone of influence and you will see her
participating in counter jungling, objective control, and running off
to gank both top and bottom lanes. You will also see Team Royal
going very aggressive during the pre-minion spawn time.
+ Very, Very Strong Fizz
– Ban Fizz versus Team Royal. Their mid laner absolutely loves to
play Fizz and is extremely good at him. Even when shutdown in 2v1
lanes, he still manages to come back and carry extremely hard on this
champion. Expect to see him banned versus Royal, or to see some
amazing play out of their mid laner on Fizz.
Europe
-
During
the Summer Season, Europe had the highest amount of competition for
the top spots of the region. The teams are very used to playing in
high pressure situations and the practice under the stress of every
game having large implications for them may provide the EU teams with
a small edge in that area.
+
Objective Control Focus - Recognizing the value of objectives over
kills, the teams from this region place a high value on controlling
objectives. Expect to see fights break out around turrets and dragon
and expect to see objectives pushed after every teamfight. NA/EU/KR
are the only regions to place a huge priority on getting objectives
after won teamfights. They feel that if you don't get an objective
after each won teamfight, then you did not properly use the advantage
you gained.
+
Variety of Strategies – The EU teams know how employ and deal with
a large variety of strategies, team comps, and play styles. Expect
to see the likes of Split Pushing, Team Fight Oriented, Skirmishes,
Pick, and more Comps will come from this region's teams.
+
Mercury Treads – EU teams have the most willingness of any region
to pick up Mercury Treads on any of their champions. Just as often
as their carries will pick up Sorcerer's Boots or Berserker Greaves,
they will pick up Mercury Treads. Opposing teams need to recognize
this and be prepared for EU's carries to be less susceptible to CC.
+
ADC's as Casters – EU love to play their ADC's as casters. With a
heavy focus on their mid laners, the EU use their ADC's for upfront
damage. Expect to see EU's
ADC's building Bloodthirster, Last Whisper, and Infinity Edge before
they pick up Attack Speed outside of Berserker Greaves.
+
Mid Lane Focused – EU focuses a lot of their effort and attention
into the mid lane. Their mid lane players are some of the best and
you can expect junglers to be providing a lot of support to get their
mid laners rolling into the play makers they love to be.
Team
Lemondogs -
The new team on the
scene, but holding the number 1 spot in EU for the longest time, the
Lemondogs are a strong team. During the EU Regionals, they seemed to
be playing a little lackluster, but I believe this is due to them
being satisfied with just making it to the EU Regionals. With the
time since them, I believe they will have picked up their desire and
effort as being in the World's after their first season in
professional play sets in.
+ Twisted Fate – One of
the few teams to still employ Twisted Fate since the nerfs, the
Lemondogs actually feel he is stronger since his passive change.
Expect to see him banned or played, and to have a very large effect
on the outcome of the games he is in.
Team
Fanatic -
Taking the number one
spot from Lemondogs during the EU Regional Qualifiers, Fanatic is
most likely EU's strongest team. Constantly keeping control of games
and forcing them to played at their pace. Breaking their flow will
be key for other teams.
+ Aatrox – Both Fanatic
and Gambit really love to play Aatrox and they are the only teams in
the Worlds that put priority on him. Aatrox is a big pick in EU and
no where else. Teams from the other regions need to be prepared to
see him played both in the Jungle and Top lane. Whichever lane he is
in, Aatrox will be a bully and in any duel situation players cannot
forget about the massive leach that he has.
+ Yorick – The only
team to play Yorick outside of China. Fanatic prefer to play him top
lane though as a lane bully.
Team
Gambit Gaming -
EU's
most aggressive team, Gambit Gaming are definitely a favorite in the
EU scene. Their play style is very aggressive and if they can get
even a small lead in the early stages of the game they will turn it
into a huge win.
+ Aatrox – Both Fanatic
and Gambit really love to play Aatrox and they are the only teams in
the Worlds that put priority on him. Aatrox is a big pick in EU and
no where else. Teams from the other regions need to be prepared to
see him played both in the Jungle and Top lane. Whichever lane he is
in, Aatrox will be a bully and in any duel situation players cannot
forget about the massive leach that he has.
+ Miss Fortune –
Gambit's ADC loves Miss Fortune and will pick her up almost anytime
she is available. Teams need to be prepared for his very aggressive
lane presence on his favorite champion. I wouldn't be surprised to
see him pick up the new Trinity Force on Miss Fortune, but we will
have to wait and see.
+ Eve Jungle – Gambit's
Jungler's favorite champion to play, Eve creates a lot of pressure
around the map just by being Eve. The constant invisibility causes
her to be in the back of the opposing teams mind at all times.
Gambit also know how to make great use out of Eve to creat teamfights
and during them as well.
Korea
-
The
region hailed as having the
strongest teams of all, we can expect big things from all three teams
from this region. Interestingly enough, the Korean teams are the
ones that play most like the current NA/EU LCS teams and the same
strengths can be seen from them as well.
+
Objective Control Focus - Recognizing the value of objectives over
kills, the teams from this region place a high value on controlling
objectives. Expect to see fights break out around turrets and dragon
and expect to see objectives pushed after every teamfight. NA/EU/KR
are the only regions to place a huge priority on getting objectives
after won teamfights. They feel that if you don't get an objective
after each won teamfight, then you did not properly use the advantage
you gained.
+
Variety of Strategies – As top of the top professional teams, the
Korean teams know how employ and deal with a large variety of
strategies, team comps, and play styles. Expect to see the likes of
Split Pushing, Team Fight Oriented, Skirmishes, Pick, and more Comps
will come from this region's teams.
Team
Najin Black Sword and Team Samsung Ozone -
Unfortunately,
these two teams were not a part of the regionals, having bypassed
them with the amount of League points they have accumulated. Both
will be extremely strong teams and from what games I was able to find
and watch, play very much the same as most of the region. We can
expect very strong play, very objective controlled styles, and a
large variety of team comps. Analysts and casters of the Korean
region however, are toting SK Telecom
as Korea's currently strongest team, not the 1st
place Najin or the 2nd
place Ozone. This is due to the play styles and champion choices of
SK Telecom in relation to patch 3.10 and 3.11.
Team
SK Telecom -
A favorite to take first
in the World's, they are an extremely strong team right now. The
changes in patch 3.10 and 3.11 have vastly increased SK's chances
with how well the patches have fit into their champ picks and
playstyles.
+ Extremely Strong Mid
Laner – Faker of Team SK is a very large portion of the team. His
ability to make plays, carry, and keep his team strong in bad
situations is greater than even most of the professional Mid laners.
Shutting him down will be hard, and potentially necessary for
opposing teams.
+ Elise Top – Used to
be a very popular pick, playing Elise top is rarely seen as of late.
Team SK however, will still pull her out. Other teams top laners
need to remember her strengths.
North
America -
Constantly
poked at as being the lesser of the regions, this year may be the
year that NA teams prove the world wrong. With strong showings from
all three qualified teams, the NA region is out to prove that they
deserve to be fighting for the top spots.
+
Objective Control Focus - Recognizing the value of objectives over
kills, the teams from this region place a high value on controlling
objectives. Expect to see fights break out around turrets and dragon
and expect to see objectives pushed after every teamfight. NA/EU/KR
are the only regions to place a huge priority on getting objectives
after won teamfights. They feel that if you don't get an objective
after each won teamfight, then you did not properly use the advantage
you gained.
+
Variety of Strategies – The EU teams know how employ and deal with
a large variety of strategies, team comps, and play styles. Expect
to see the likes of Split Pushing, Team Fight Oriented, Skirmishes,
Pick, and more Comps will come from this region's teams.
Team
Cloud 9 -
Cloud 9 has been
dominating the NA scene. Having one of the best seasons in any
region and showing their strength time and time again, Cloud 9 is a
favorite, at least in NA, to take the World Championship. With
extremely coordinated team fights and probably the highest objective
focus of any team, Cloud 9 are going to be a massive threat.
+ Dragon Fights – Cloud
9 love the dragon. More specifically, they love the fight that
dragon creates. Cloud 9 excels at fight at or near dragon and many
of their games are won at the first dragon fight. Teams need to be
aware of how strong Cloud 9 are at dragon and be prepared to let it
go and take other objectives, or to come in to the dragon fight with
a very strong teamfight.
+ Ashe/Zyra Combo –
Cloud 9 popularized this combo and they play it to great effect. I
expect to see it either banned or picked out. Cloud 9 need to be
ready for the amount of priority that other regions put on Zyra as a
support, even outside of the Ashe/Zyra combo. No doubt Cloud 9 are
just as solid without this comp, but if they get it, expect great
things.
+ Metoes' Jungle Style –
Metoes his highly acclaimed as the most efficient jungler and
possibly the best jungler. His style of play is maximizing his time.
He will rarely go for a gank unless he knows that he has a kill,
preferring to get the guaranteed gold from the jungle, than spend a
minute or more trying to make a gank happen. However, his positioning
sense and presence are uncanny and rarely is he not where he needs to
be. Opposing teams junglers will need to be able to keep up with
Meteos or the presence he provides will be their undoing.
+ Rumble – C9's top
laner is extremely potent on Rumble. Often times he will turn a 2v1
into a double kill for himself while on this champion. His ultimates
are always spot on, providing huge impact in any fight. While not
the highest priority for other teams, I still feel that Rumble
deserves a targeted ban when it comes to Cloud 9.
Team
TSM -
A
fan favorite in NA and a long standing team that has been to Worlds
before. TSM are expecting a lot out of themselves and put a lot of
pressure on doing well in the worlds. They may be the team putting
the most pressure on themselves in the Worlds.
+
Long Standing – One of the
teams that have been around the longest, TSM is comfortable playing
in the large scenes with lots on the line. Their best performances
happen in high pressure situations and I expect their play during the
worlds to be a step above their play during the LCS.
+
Mid-laner Reginald – Owner, Shot caller, and Play maker for TSM,
Reginald puts a lot of weight on his shoulders. A very strong
player, expect to see a large portion of TSM's ability to win games
centering around Reginald. The downside however, is that when
Reginald gets shutdown, he frustrates easily. Get Reginald
frustrated and TSM falls apart.
Team
Vulcun -
NA's
second strongest team during the LCS, Vulcun have made just as strong
a showing throughout the season as Cloud 9, being the only team to
really give Cloud 9 a challenge in the season.
+
Large Champion Pool – Vulcun have one of the largest champion pools
out of any team in World's. Every player has played a wide berth of
champions over the course of the Regional Qualifiers and the season
itself. Their pick/ban phase is one of the strongest, because it is
near impossible to ban any of them out.
Southeast
Asia – Team Mineski
Playing
similarly to the Chinese scene, Team Mineski very much prescribes to
the see kill, get kill philosophy. Capitalized by very high
aggression, large kill/death counts, and a willingness to fight to
the last hit, be prepared for some high action games coming from Team
Mineski.
+
Good Bans – Expect this teams research to be done. The pick/ban
phase will be highly effective for Team Mineski, as in the Regionals
they seemed 100% ready for every team they fought.
+
Very Strong Mid and ADC – Be warned, these two will carry the
games. Team Mineski's mid lander and ADC are highly skilled and if
not shut down early, will be huge problems for other teams.
+
Scattered Teamfights – Team Mineski love spread out teamfights.
They are very skilled at exiting and entering battles at the right
time, maximizing the effect they can have on teamfights. They will
attempt to separate opposing teams, catching out high priority
targets if any mistakes are made.
+
High Kill Counts – With the see kill, get kill mentality prevalent
in their region, Team Mineski's games have very high kill/death
counts, often ending with over 50+ kills between the two teams. This
play-style accelerates player builds. It may be possible to throw a
wrench into their game by not allowing Team Mineski to pick up so
many kills. The lack of accelerated builds could potentially throw
off their game timing.
+
Ryze and Top Lane Jarvan - While most other regions and teams have
dropped Ryze, Team Mineski's mid laner still plays him, and to
devastating
effect. The rest of the World's teams will need to be prepared for
this. The other quirk, is that they like to play Jarvan top lane as
a Burst Damage dealer. Rarely seen in other regions, teams need to
be ready to face a very high damage Jarvan and not be caught off
guard by it.
TW_HW_MO
– Gamania Bears
Though
only having a few games to go on from the Regional Qualifiers, there
are a few things to note coming from this team. Playing much like the
Chinese scene, here are a few things you can expect from the Gamania
Bears.
+
Extended Engages – Generally starting engages in small skirmishes,
the Gamania Bears are quick to rotate and collapse from all lanes to
join any fight. This often results in engages that last for a minute
or longer as each new person joins the fight.
+
Fighting with Low HP – Expect the Gamania Bears to fight even with
HP so low that a soft breeze will kill them. They are very good at
knowing just how much damage they can take (especially from towers)
and will stick around until the last moment. Though this is high
skill play, it also gets them in to trouble as sticking around so low
has gotten them killed unnecessarily.
+
Lots of Roaming – Gamania Bears almost play without a lane. With
their preference for extended engages and desire to chase down any
fight, Champions are constantly moving from one lane to the other,
clearing out a wave of creeps and then running off again.
+
Unimpressive CS - With their priority on fighting and roaming, the
Gamania Bears CS is not very impressive compared to other regions.
Often times, by the 30 minute mark, only one champion would be above
200 CS, and rarely by much.
+
Always Carriers Red Pots – An interesting tactic, every player on
the Gamania Bears will generally have a red pot on them throughout
the game. With their preference for extended fights, even one pot
can be the difference between a win and a loss. The extra hp it
provides for its low cost is a huge benefit to them
+
Very Aggressive – Gamania
Bears like to fight, and they will almost always seek them out or be
harassing in lanes. The downside to this though, is that they put
themselves into a lot of danger by doing this. Their aggression is
not often backed by a safety net and can be easily punished.
Wildcard
– Gaming Gear
Though
having a strong showing during the Wildcard tournament, Gaming Gear
are the underdogs of the tournament. Having the least experience at
this competitive level, it will be unlikely that they make it out of
the group stages, however, I would not count them out completely.
Being the team that others will have focused on the least, they have
a great opportunity to prove themselves a threat, especially if we
assume that they have been training with EU's professional teams
lately.
+
Good Berth of Champions – Over the course of their Qualifiers,
Gaming Gear showed the largest variety of played Champions. With
only one loss during the Qualifiers, they also know how to play all
of their Champions. It will be difficult to shut them down through
picks/bans.
+
Solid Gameplay – For the most part, Gaming Gear's play was very
solid, following primarily the NA/EU styles. However, their biggest
weakness was knowing when they were ahead and how to take advantage
of it. Opting into the slow burn style of winning, other teams in
the World's will be able to take advantage of that.
+
Weaker Team Cordination – While far above most teams still, the
coordination of Gaming Gear's team play, both in team fights and map
control, is lacking compared to the more experienced teams.
Twitter:
@SnowSpotsGaming
Subscribe to:
Comments (Atom)